Fix mailbox showing up in both Exchange Online and on-premises | Exchange Hybrid

Recently, I came across an issue where a user complained that he is not receiving emails from internal applications. Upon checking the mailbox status I noticed that the user had a mailbox hosted on our Exchange on-premises server and also on Exchange online. The on-prem mailbox only had around 100 MB, while the cloud mailbox had around 5GB data.

When the mailbox creation dates were compared, the online mailbox was created first and the on-prem mailbox got created later. In this situation when an office 365 user sends email to user it will be delivered to the cloud mailbox and when an on-prem user send email to will be delivered to the on-prem mailbox. Not sure how this condition happened, but couple of reasons are discussed here.

In this post I will be discussing the steps to recover from this scenario without making any changes to the cloud mailbox as the primary mailbox of my user is hosted in Office 365. If you want to try the other way around ie, recovering by removing the cloud mailbox and not touching the on-prem check this article instead.

1) Run the powershell command to save all mailbox information of both on-prem and cloud mailbox to a file. Make sure the data on the on-prem mailbox is exported to a PST file prior to following the below steps.

Get-Mailbox “mailbox identity” | fl > mailbox.txt

2) On the Exchange 2013 ECP, disable the user mailbox by clicking on the ellipsis (…) -> Disable.

Alternatively, you can run the below powershell cmdlet as well to disable the mailbox

Disable-Mailbox “mailbox identity”

Note : Do not delete the mailbox, only disable/disconnect. You will get an error while disabling the mailbox, if litigation hold is enabled. You can remove litigation hold by running the below command:

Set-Mailbox -Identity “user identity” -LitigationHoldEnabled:$false -DomainController DCName

3) Create a remote mailbox for the user on on-premises by running the command:

Enable-RemoteMailbox “user identity” -RemoteRoutingAddress “user@company.mail.onmicrosoft.com”

Add any additional SMTP addresses to the remote mailbox object from ECP if required. If you are using any custom attributes for AD Sync, update the same as well.

4) Identify the Exchange Online GUID of the cloud mailbox by running the below command in Office 365 Exchange Online shell

Get-Mailbox “mailbox identity” | fl *Exchangeguid*

5) Stamp the Exchange Online GUID on the remote mailbox in on-premises. This is not mandatory but will be helpful during any future mailbox offboarding.

Set-RemoteMailbox “user identity” -ExchangeGuid “Exchange Online guid”

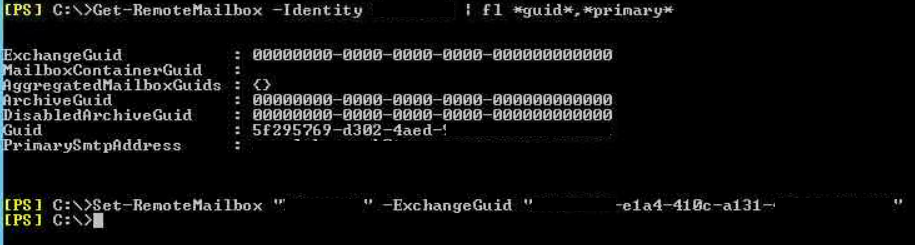
You can see in the above screenshot that using Get-Mailbox we can verify the current Exchange Guid value. In this case its blank.

6) Now either force a directory sync or wait for the delta sync to complete. Restore the on-prem mailbox data to cloud if required.

MC218984 – Office 365 ATP: External email forwarding controls and policy change

On July 21, 2020 you might have received this notification in your Office 365 Message Center to plan for an Office 365 change by August 28, 2020. People who are not aware can search their Message Center or refer MS Roadmap here.

Microsoft is updating their anti-spam policies to control the way automated external email forwarding works in O365 tenants. Currently, external forwarding through SMTP forwarding or inbox rules are enabled by default at the tenant level. As per the latest notification starting September 1, 2020 automatic forwarding will be disabled by default. So, the emails that are forwarded externally will be blocked and the sender will receive a non-delivery report (NDR). However please note, Exchange transport rules are exempted from this change.

Organizations who do not want to enable external forwarding do not have to make any change as all those emails being forwarded through SMTP forwarding or inbox rules will be blocked by default with this new change.

For Organizations who wish to continue auto-forward emails externally please do the following:

1) Find out which users or how many emails are being auto-forwarded through the SMTP forwarding and inbox rules in the organization. This can be identified by referring the Auto-forwarded messages report in the Mail flow Dashboard of the O365 Security and Compliance Center.

Once you have identified the users and number of emails going outside control this by doing the next two steps.

2) On the O365 Security and Compliance Center, navigate to Threat management -> Policy. Under Policies, lookout for Anti-spam settings. Select the default Outbound spam filter policy that will be always ON.

Click on Edit Policy -> Automatic forwarding. From the drop-down list under Automatic forwarding enabled make sure On – Forwarding is enabled is selected.

If the current setting is Automatic – System-controlled, after the change the forwarded emails will be blocked.

3) Now, click on Create an Outbound policy under Anti-spam settings. A new policy is being created to have more granular options for the auto-forwarding configuration.

Similar to step 2, under Auto forwarding select the setting On – Forwarding is enabled from drop-down list.

Next, under the Applied to section select either of the below three conditions as per your organization’s requirement. Either you can add your entire domain (along with other accepted domains), restrict to specific users only or add all the allowed users to a group.

You can also add any exceptions if required and save the policy. For detailed explanation refer here.

It is important to note that custom policies will always have higher priority when compared to the default policies.

Change Office 365 Semi-Annual update channel to Current channel

The Office 365 ProPlus subscription primarily has three update models namely,

a) Current Channel (previously Monthly channel)

b) Monthly Enterprise Channel

c) Semi-Annual Enterprise Channel (previously Semi-Annual channel)

These update channels defer in terms of the release frequency in which they receive feature updates. Be it any of these models, you will likely receive security and non-security updates that provide fixes for known issues, provide stability, performance etc on a regular basis usually every month. For more information on these models refer here, for details on latest changes to the update models refer here.

To check your current update channel, launch Outlook. Navigate to File -> Office Account. In my case its the Semi-Annual channel as shown below:

Close all office applications prior to making changes. The typical method to change update model to the Current channel is shown below:

  1. Launch Command prompt as an Administrator
  2. Navigate to C:\Program Files\Common Files\Microsoft Shared\ClickToRun
  3. Run the following command: OfficeC2RClient.exe /changesetting Channel=Current
  4. Run the following command: OfficeC2RClient.exe /update user

At times the above steps may not work if you are using a locked down machine, thanks to SCCM/Group policies etc in the environment. If this is the case you can make use of registry editor as discussed below:

  1. On Windows go to Start -> Run wizard
  2. Type Regedit and click OK
  3. Navigate to HKEY_LOCAL_MACHINE\SOFTWARE\Microsoft\Office\ClickToRun\Configuration
  4. Modify the CDNBaseUrl key value to http://officecdn.microsoft.com/pr/492350f6-3a01-4f97-b9c0-c7c6ddf67d60. This the CDNBaseUrl value for Current channel. If you are currently running Semi-Annual channel you will see the value as http://officecdn.microsoft.com/pr/7ffbc6bf-bc32-4f92-8982-f9dd17fd3114.
  1. Now open cmd and change to the location C:\Program Files\Common Files\Microsoft Shared\ClickToRun and run the following command: OfficeC2RClient.exe /update user or
  2. Launch an office application for eg; Outlook, navigate to File -> Office account -> Update Options -> Update Now

You can also execute the above operations as a script by copying the below data to a notepad and saving as .bat file.

************************************************************************

setlocal
reg query HKEY_LOCAL_MACHINE\SOFTWARE\Microsoft\Office\ClickToRun\Configuration\ /v CDNBaseUrl
if %errorlevel%==0 (goto SwitchChannel) else (goto End)
:SwitchChannel
reg add HKEY_LOCAL_MACHINE\SOFTWARE\Microsoft\Office\ClickToRun\Configuration /v CDNBaseUrl /t REG_SZ /d “http://officecdn.microsoft.com/pr/492350f6-3a01-4f97-b9c0-c7c6ddf67d60” /f
reg delete HKEY_LOCAL_MACHINE\SOFTWARE\Microsoft\Office\ClickToRun\Configuration /v UpdateUrl /f
reg delete HKEY_LOCAL_MACHINE\SOFTWARE\Microsoft\Office\ClickToRun\Configuration /v UpdateToVersion /f
reg delete HKEY_LOCAL_MACHINE\SOFTWARE\Microsoft\Office\ClickToRun\Updates /v UpdateToVersion /f
reg delete HKEY_LOCAL_MACHINE\SOFTWARE\Policies\Microsoft\Office\16.0\Common\OfficeUpdate\ /f
“%CommonProgramFiles%\microsoft shared\ClickToRun\OfficeC2RClient.exe” /update user
:End
Endlocal

************************************************************************

Below are the CDNBaseUrl for different update channels:

Current Channel (Preview) previously [Monthly Channel (Targeted)]:
http://officecdn.microsoft.com/pr/64256afe-f5d9-4f86-8936-8840a6a4f5be

Current Channel previously [Monthly Channel]:
http://officecdn.microsoft.com/pr/492350f6-3a01-4f97-b9c0-c7c6ddf67d60

Monthly Enterprise Channel :
http://officecdn.microsoft.com/pr/55336b82-a18d-4dd6-b5f6-9e5095c314a6

Semi-Annual Enterprise Channel (Preview) previously [Semi-Annual Channel (Targeted)]:
http://officecdn.microsoft.com/pr/b8f9b850-328d-4355-9145-c59439a0c4cf

Semi-Annual Enterprise Channel previously [Semi-Annual Channel]:
http://officecdn.microsoft.com/pr/7ffbc6bf-bc32-4f92-8982-f9dd17fd3114

Beta Channel:
http://officecdn.microsoft.com/pr/5440fd1f-7ecb-4221-8110-145efaa6372f