How to find if your Exchange Server is an Open Relay ? How to close an Open Relay ?

An Internet facing Exchange server is said to be an Open Relay if, it accepts emails from any sender and delivers it to any recipient no matter if the recipient exists or not.

For eg: Consider that you have an Exchange Organization setup for the domain xyz.com. A user jim@abc.com sends an email to roddick@efg.com through your Exchange Server. The server accepts the email even-though the domain and user mailbox is unknown for it.  Such a set up can be extremely vulnerable to attacks and is not considered as a best practice.

Thus, from the above example you will get an idea that an Exchange Organization which is built upon the Best Practices will be configured only to accept emails from external senders to recipients that are either members of the Exchange Organization or an Accepted Domain [known domain].

Tests to find if an Exchange Server is an Open Relay :-

  • TELNET TEST: This is a simple test can be performed from the command line. We will try to send an email to an unknown user and check if the server accepts it or not.
  1. Start Command Prompt (CMD) by searching in Windows
  2. Type telnet and press Enter
  3. Once in telnet prompt, type set localecho
  4. Then type open [external ip/name] 25  eg: open 20.30.40.50 25
  5. Following response will be received ‘220 mail.server.domain Microsoft ESMTP MAIL Service, Version: 6.0.2790.0 Ready at’
  6. Type the command : ehlo firsttestdomain.com [Make sure that ‘firsttestdomain.com‘ is anything other than the domain your Exchange Server handles]
  7. Select OK and you will receive the following :250 OK
  8. Type the command mail from:user@firsttestdomain.com [Note, this email address is not a mailbox in the Exchange Server]
  9. Select OK and you will get the response
    250 2.1.0 user@firsttestdomain.com….Sender OK
  10. Type the command rcpt to:user@secondtestdomain.com [completely a new address not mentioned above]
  11. Once you select OK, you will receive a response and depending on that response we can determine if the server is an open relay or not:

If the response is

550 5.7.1 Unable to relay for user@secondtestdomain.com means, your server is not an open relay & is secure

At the same time, if the response is

250 2.1.5 user@secondtestdomain.com  means your server is un-secure and is an open relay.


  • DNSBL DIAGNOSTIC TEST : An alternative and a quick solution to determine open relay is by checking the domain against any of the DNS Block List providers such as MXTOOLBOX.COM.
  1. Access the website MXTOOLBOX.COM
  2. Select the SMTP DIAGNOSTICS tab
  3. Enter your mail server IP address or external name and select the Test Email Server tab
  4. You will receive a response stating whether the server is an open relay or not as shown in below eg:

MXTOOLBOX


CAUSES OF OPEN RELAY :-

The main causes that can turn an Exchange Server to an Open Relay is the configuration issues with the connectors and Accepted Domains. The following checks can be done on this regard:-

  • If ‘Externally Secured‘ option is enabled on the Internet Send/Receive connectors.

In the Exchange Management Console, Send Connectors can be found in Hub Transport role under Organization Configuration while, Receive Connectors in Hub Transport role under the Server Configuration. Make sure that in the properties -> Authentication section of these Internet connectors, the Externally Secured option is disabled in order to stop your Exchange Server being an Open Relay .

  • If Accepted Domains configured as ‘*’

In the Exchange Management console, Accepted Domain comes in Hub Transport role under Organization configuration. Accepted Domains are the domains that are known to the Exchange Server. The domains can be either Authoritative or Non-Authoritative. Make sure that no Accepted Domain are configured as ‘*’ to help protect your Exchange Server from being an Open Relay.


CLOSING AN OPEN RELAY ON EXCHANGE SERVER 2007/2010:-

The following command can be executed on Exchange Management Shell to disable Open Relay on an Exchange Server.

Get-ReceiveConnector “YourReceiveConnectorName” | Remove-ADPermission -User “NT AUTHORITY\ANONYMOUS LOGON” -ExtendedRights “ms-Exch-SMTP-Accept-Any-Recipient”

as per the link http://alanhardisty.wordpress.com/2010/07/12/how-to-close-an-open-relay-in-exchange-2007-2010.

Enable multiple RDP sessions on Windows Server Operating Systems

By default in Windows Operating Systems, a user account is entitled only for a single RDP session. That means once you are logged in to a server remotely using a user account say Administrator, a simultaneous connection to the server again using the Administrator account will result in the disconnection of the previous session.

This can be taken care of within the Windows itself by enabling multiple RDP sessions. You can achieve the same by any of the below mentioned methods :

Through registry modifications :->

  •  Log in to the Windows Server
  • Launch Registry Editor from Run by typing the command regedit
  • Navigate to the following registry key :

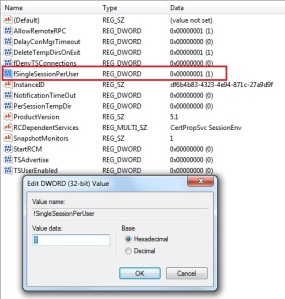
HKEY_LOCAL_MACHINE\SYSTEM\CurrentControlSet\Control\Terminal Server

  • Select the key fSingleSessionPerUser, double click the same
  • To enable multiple sessions, set the decimal value to 0 and to disable use the decimal value 1
  • Try logging in to the server simultaneously and confirm the same

Reg

Through local group policy editor:->

  • Log in to the server
  • Launch Local group policy editor from Run using the command gpedit.msc
  • Navigate to Computer Configuration > Administrative Templates > Windows Components > Remote Desktop Services > Remote Desktop Session Host > Connections
  • Select the policy “Restrict Remote Desktop Services users to a single Remote Desktop Services session
  • In order to enable multiple sessions, change the policy setting to “Disabled”  and update the policy

remote


The above settings can also be deployed via a group policy as well. Only difference is that you will have to launch the Group Policy Management Console [gpmc.msc] and create a new group policy.

Procedure to delete shadow copies on Windows server 2003 and later

Volume Shadow Copy :-

VSS or Volume Shadow Copy is a service that creates snapshots or point in time copy  [shadow copies] of disk volumes. This service was introduced in Windows Server 2003.

Components of VSS :->

  • VSS Writer : Each VSS-aware application installs its own VSS writer to a computer during the initial installation.
  • VSS Requestor : Software that commands the creation of Shadow Copies. It is actually the backup application itself.
  • VSS Provider : It takes care of keeping the shadow copies after that consistent point-in-time

How to delete shadow copies ?

vssadmin delete shadows /for=<ForVolumeSpec> [/oldest | /all | /shadow=<ShadowID>] [/quiet]

To get the shadowID, use the command : vssadmin list shadows
  • /for=<ForVolumeSpec> – Specifies the volume for which the shadow copies needs to be deleted
  • /oldest – Deletes only the oldest shadow copy
  • /all – Deletes all the shadow copies of the specified volume
  • /shadow=<ShadowID> – Deletes the shadow copy specified by the ShadowID
  • /quiet – command will not display any messages

How to troubleshoot VSS errors ?

In CMD, execute the command vssadmin list writers. In the result, check whether any errors are reported for the writers. Also, check the result for vssadmin list providers and troubleshoot if any errors are reported.

Default Send/Receive connectors in Exchange 2013 !!

As we all know, it has been some time after the release of Exchange Server 2013. Some of you must have had the chance on getting a hands on experience with Exchange Server 2013. The Exchange Management Console has disappeared and the Exchange Admin Center which is a web console, is used for the Exchange Server Management with an Exchange Toolbox, as before.

Most of you must have configured send/receive connectors on Exchange 2007 or 2010, the steps for which is almost the same. However, with Exchange server 2013 the connector configurations are little bit confusing especially the Receive Connector configurations.

Exchange 2013 has by default 5 receive connectors and 1 send connector (as usual) which are essential for the mail flow.

Types of connectors

Recently we had faced an issue with one of our client who had accidentally deleted all his connectors and we were assigned the tasks to reconfigure them.

The default Exchange Server 2013 receive connectors, their associated ports and configurations according to the server roles are discussed below. On a mailbox server you will find :-

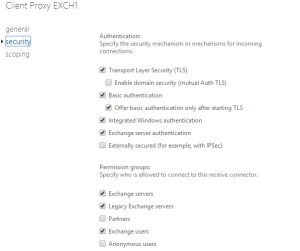
  • Client Proxy [server name] – It accepts connection from Frontend servers.

Client Proxy 1          Client Proxy 2

Client Proxy 3

  • Default [server name] – It accepts connection from Mailbox servers that has the Transport service running and the Edge servers.

Default 1        Default 2 Default 3

At the same time, on a CAS you will find :-

  • Client Frontend [server name] It accepts secure connections, that has the Transport layer Security (TLS) applied.

Client Frontend 1            Client Frontend 2Client Frontend 3


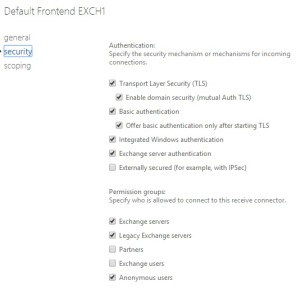
  • Default Frontend [server name] – It accepts messages from SMTP connections over port 25.

Default Frontend 1          Default Frontend 2

Default Frontend 3

  • Outbound Proxy Frontend [server name] – It accepts connections from a smart host.

Outbound Proxy 1          Outbound Proxy 2

Outbound Proxy 3

In order to avoid confusion, keep in mind that anything related to Frontend will be part of the CAS. This is because messages comes into the CAS first which in turn is forwarded to the Mailbox Server.


Only 1 internet send connector is required for the mail flow to work successfully. You can specify either a smart host to route emails or directly use DNS for email delivery.


Display and reset remote sessions using QWINSTA and RWINSTA !!

Each and every one of you might have at times faced issues connecting to a Windows Server or desktop machine due to disconnected sessions. At first, you might try to connect using the admin console only to know that a console session already exists. There are chances people even might think of remote rebooting the server/desktop. If so, WAIT & take a glance below !!

Steps to display remote sessions on a machine :

  • Launch CMD
  • Execute the command qwinsta /server:servername. eg :

qwintsa

  • Note the session IDs of the remote sessions on the server

Steps to reset or kill remote sessions on a machine :

  • Launch CMD
  • Execute the command rwinsta ID /server:servername. eg :

rwinsta

  •  Check and confirm that the remote sessions have been removed.