Installing Exchange 2013 in an Exchange 2010 SP3 Hybrid Environment

I have an Exchange 2010 SP3 hybrid set up in my lab, and is planning to install and an Exchange 2013 as an Hybrid server.

I directly ran the Exchange 2013 setup without performing any schema preps and received the following error

hybrid

So, I went on to my DC server and tried executing the commands for Schema preps as shown below only to get another failure notification :

hybrid1

As I am already in Hybrid, Exchange requires me to run the prep command adjacent to the /TenantOrganizationConfig switch. You also have to generate a config xml file by connecting to your Exchange online tenant.

For this, connect to your Exchange online tenant through powershell and execute the below command :

Get-OrganizationConfig | Export-Clixml -Path MyTenantOrganizationConfig.XML

hybrid2

The xml file will be generated as shown above. Copy the xml file to C: of the server where you are running the prep command ie, the DC.

Make a note that instead of /PrepareSchema, we will use /PrepareAD to run the /TenantOrganizationConfig switch adjacent to the setup.

.\Setup.exe /PrepareAD /IAcceptExchangeServerLicenseTerms /TenantOrganizationConfig:C:\MyTenantOrganizationConfig.XML

hybrid3

The Exchange setup will complete successfully now. 🙂

Step by Step : Migrate to Office 365

As we all know Office 365 is Microsoft’s cloud hosting platform which is much popular now. Most of the small business organizations are planning to or have already migrated to Office 365.

The popularity of Office 365 in the small business sector is mainly because its hosted in Microsoft Datacenter in cloud and that your company does not have to spend money on IT and IT support. You can leverage Office 365 to use Exchange Online, Sharepoint Online, Lync online, Office web apps etc..

If you currently have an on-premise Exchange Server, or if you are setting up your infra for the first time the following steps will help you for the same:

  • First purchase the Office 365 subscription of your choice.

You can either use the default domain which Microsoft provides ie, @companyname.onmicrosoft.com or the domain which you have already purchased from any of the registrar’s. Here, I assume you have your own domain in hand.

  • Log in to your Office 365 account with the credentials provided from Microsoft
  • Select Manage Domains from the Admin console

Office 365

  • In Manage Domains section, at first you will see the default domain provided by Microsoft ‘@companyname.onmicrosoft.com
  • As we will be adding a new domain to Office 365, select Add Domain tab in the console

office 4

  • There will be a list of steps which needs to be performed for adding the domain as shown below-

office 3

  • You will have to specify the domain name first and then click on Next

office6

  • Next part is the domain verification process. office 365 will confirm whether you are the owner of the domain or not. For this you will have to create either a TXT record or an MX record on your domain’s DNS. Usually Office 365 will ask to create any of the below records :

office5

Once you have created either of the records in your domains DNS console, your domain will be verified.

  • Next, you will have to create users for the domain and assign licenses

office7

  • The next step is to create the DNS records provided by Office 365 in your domain’s DNS. If you are planning to use all the Office 365 services, you will have to create the below records :


12

Note: It’s always better to keep your old MX records as a backup with low priority and the Exchange Online MX record with higher priority. Make sure you proceed with the domain set up only after creating the relevant records. Office 365 will not proceed if any records are missing.

Once all records are created, click Finish and your domain will be now added to Office 365.

  • Select the new domain under Manage Domains, and select Set as default, to make it the default domain
  • If you have only one license, assign the license to the new user account

license

  • Next step is to change the primary email address to the new domain. For this edit the user account and select Primary Email Address.

primary

  • Assign the new user Administrator privileges so that the new user will also have access to the Admin console. This can be done from the settings of the user account.

permissions

  • Check and confirm that the mail flow

Office 365 also lets you access office apps like MS Word, MS PowerPoint etc as well as OneDrive. You will have to download the app for the same from office 365 console to be installed on your PC.


Generate Remote Activation Password for Blackberry user !!

With the help of Remote Activation, a user can activate his/her RIM Blackberry which is on a Blackberry Enterprise Server. For this the blackberry user will have to request a Remote Activation Password from the Blackberry administrator.

Following are the steps that needs to be performed on the BES:

  • Launch Blackberry Administration Service. Log in using your credentials.

1

  • Select Manage Users from Users section.

new

  • Select the user, right click and select Properties. Navigate to Device Activation -> Specify an Activation Password

new2

  • Set the Activation Password as per your wish. Provide this to the user to perform a Wireless Enterprise Activation.

Troubleshooting Outlook Anywhere issues

Resolving Outlook Anywhere issues can some time be very tedious. The best tool you can use to troubleshoot or test Outlook Anywhere is Microsoft’s own Remote Connectivity Analyzer available at https://testconnectivity.microsoft.com.

The interface is shown below:

oa

To test Outlook Anywhere, you can select the Outlook Connectivity option selected above and click Next.

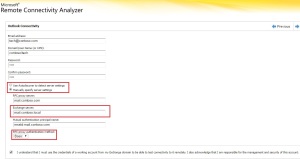
On the next page fill the text boxes as shown in the below screenshot.

Note:- If you have configured Autodiscover for Exchange, select the ‘Use Autodiscover to detect server settings‘ option to automatically detect your server or otherwise select ‘Manually specify server settings‘ to provide the settings manually. Also, when providing the settings manually make sure that under Exchange Server mention the internal hostname of the Exchange Server. Specify the type of Authentication configured either Basic or NTLM.

oa1


The connectivity analyzer will now perform a series of tests. There will be a slight difference in the tests if you have selected to detect the server using Autodiscover or manual settings. For manual settings the tests will be in the order:

  1. Resolve the external hostname of the Exchange Server in DNS
  2. Check and confirm that TCP port 443 is listening and open
  3. Check the validity of the SSL certificate
  4. Check the IIS configuration for client certificate authentication
  5. Check the configured authentication mechanism eg: Basic, NTLM, Negotiate
  6. Check valid ports 6001, 6002, 6004 etc..

In case of Autodiscover, the tests will be:

  1. Test the Autodiscover URL, https://url:443/Autodiscover/Autodiscover.xml
  2. Resolve the external hostname of the Exchange Server in DNS
  3. Check and confirm that TCP port 443 is listening and open
  4. Test the autodiscover URL, https://url:443/Autodiscover/Autodiscover.xml
  5. Resolve autodiscover.servername in DNS
  6. Check the presence of SRV record in DNS
  7. Check the presence of autodiscover cname record in DNS… etc..

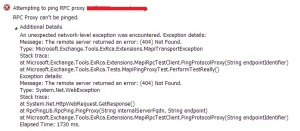
If the server configurations are correct you will receive a notification that ‘The Outlook Connectivity test completed successfully.‘ else a failure message will be reported with the exact error.

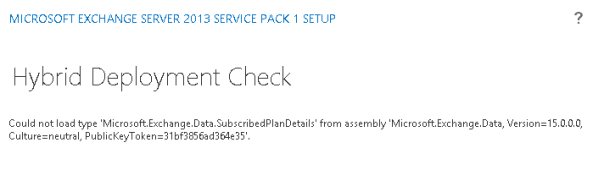
One of the error I received recently is as shown below:

rpc

Troubleshooting the Exchange Server :

  • In the Exchange Server, check and confirm that RPC over HTTP Proxy feature is installed

OA1

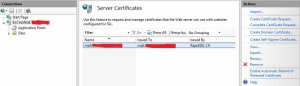
  • Confirm the presence of a valid SSL certificate, and the name of the certificate is similar to the external hostname configured for Outlook Anywhere

oa2

oa3

  • Check the authentication configured for Outlook Anywhere and confirm its the same from Exchange Management Shell and in IIS
  • Check and confirm that the RPC Proxy server uses the valid ports for RPC over HTTP. From registry editor, navigate to  HKEY_LOCAL_MACHINE\SOFTWARE\MICROSOFT\RPC\RPCPROXY.

Make sure the data in the ValidPorts key is as follows :

NETBIOS:6001-6002;FQDN:6001-6002;NETBIOS:6004;FQDN:6004

The NETBIOS name and FQDN of the exchange server is required in this area.

registry

  • Check and confirm that the authentication configured for the RPC virtual directory is IIS. This should be same as the authentication type configured for Outlook Anywhere

iis


Once the above settings are verified, you can test the Outlook Anywhere connection either by configuring Outlook on an external machine or by using Remote Connectivity Analyzer.

For steps to test Outlook Anywhere on your machine make use of this link .

In order to test Outlook Anywhere configuration from powershell use the command “get-outlookanywhere | fl” etc…


Reference : http://www.msexchange.org/articles-tutorials/exchange-server-2003/migration-deployment/Implementing-RPC-over-HTTPS-single-Exchange-Server-2003-environment.html

Enabling and configuring Outlook Anywhere

Outlook Anywhere is a feature by which you can access your company emails using Outlook  outside the LAN. It does not require VPN etc. Outlook Anywhere is also known in other terms like RPC over HTTP, Remote Exchange etc. This feature is available in Exchange version 2003 and later.

Outlook Anywhere is not enabled by default in the Exchange Server. Below are the steps to enable Outlook Anywhere on an Exchange 2010 Server.

  • Launch Exchange Management Console
  • Navigate to Server Configuration -> Client Access
  • Right Click on the Exchange Server on the middle pane and select Enable Outlook Anywhere

exchange-

  •  Following are the settings you need to provide next for Outlook Anywhere to work successfully :

OA

External host name :- This will be your Exchange server’s external host name which can be resolved over internet. Ideally this will be the domain name mentioned in your SSL certificate as well.

Authentication :- There are two types of Authentication mechanisms. They are :-

  1. Basic Authentication : It is generally used when the connecting computers are not the members of the domain. Also, your Exchange server will be directly connected to the internet, no proxy servers like ISA/TMG will be between your firewall and Exchange Server
  2. NTLM authentication : This type of authentication mechanism is used by domain members. You will have a proxy server in place in front of your Exchange server

SSL offloading :- Don’t select this option unless you’re sure that you have an SSL accelerator that can handle SSL offloading. If you don’t have an SSL accelerator that can handle SSL offloading and you select this option, Outlook Anywhere won’t function correctly.

  • It will take around 15 minutes for Outlook Anywhere to get enabled. Once enabled, you will notice application logs with event id 3008 in the Exchange Server

Client side configurations :

  • From Control Panel, navigate to Mail
  • Add a new Exchange account
  • Specify the internal hostname of the Exchange Server in the Server section and the logon name/alias in the User Name section

OA1

  • When the mentioned fields are filled, the More Settings tab will be enabled. Click on the same and navigate to Connection settings -> Enable Exchange Proxy Settings under Outlook Anywhere

oa2

  • Specify the external hostname of the Exchange Server in the below fields and select the configured authentication type

an2


  •  Click on OK and finish the outlook configuration. Test mail flow and confirm that the outlook is working fine.

Error when changing the SMTP banner on Exchange 2013 receive connector !!

Recently I had received a request to change the SMTP banner on the receive connector of an Exchange 2013 server. Currently when trying to telnet to the mail server the FQDN displayed was the internal FQDN of the Exchange Server. The requirement of the requester was to modify the same to the external FQDN of the mail server.

Following were the steps performed on this regard :-

  • Logged into the Exchange Admin Center
  • Navigated to Mail Flow -> Receive Connectors, and selected the Default Front End Exchange connector

2

  • In the properties of the connector, selected Scoping. In the FQDN section, updated the external FQDN of the server

3

  • However, I was not able to save the configuration due to the following error :

4

Resolution :

The issue was reported due to the incorrect security permissions assigned on the Receive connector. Steps to resolve the same are :

  • On the properties of the connector, select Security permissions
  • Un-check the Exchange Server authentication check box and save the configurations

5

  • Telnet to the mail server and confirm the change in FQDN

SMTP banner


Updating GAL entries forcefully on Exchange Server 2010 using EMS

Recently I had come up with an issue as mentioned below :

A new email alias was added for a domain mailbox in an Exchange 2010 environment. On one of the users Outlook 2010, whenever the user sends an email to this new address [be it test@example.com], the email is being rejected reporting that such an email address does not exist. I initially tried the following troubleshooting methods :

  1. Tried downloading OAB manually on the workstation from Outlook -> Account Settings
  2. Compared the GUID of the OAB on the Exchange Server location ‘C:\Program Files\Microsoft\Exchange Server\V14\ExchangeOAB’ and the GUID of the OAB present in the outlook [this can be found out by pressing CTRL key + Right click on Outlook icon present in notification area to get Test E-mail AutoConfiguration. Test the setting and note the OAB GUID] and confirmed both are the same
  3. Tried updating OAB in the Exchange Server but resulted in the below error

OAB update

The above issue was resolved by removing the distribution of OAB using ‘Public Folder Distribution‘. It is safe to perform this step in an environment with no Outlook 2003 or earlier clients, as they are the one who access OAB using public folders. Once this step is performed, OAB will use Web Based Distribution.

Even after performing the above steps the issues still persisted. After searching a couple of links online, found out a thread which suggested on performing the following :

  • Update Global Address List on the Exchange Server using the command ‘Get-GlobalAddressList | Update-GlobalAddressList
  • Update Address List using the command ‘Get-AddressList | Update-AddressList
  • Update OAB using the command ‘Get-OfflineAddressBook | Update-OfflineAddressBook
  • Execute the shell command ‘Get-Mailbox | Set-Mailbox -ApplyMandatoryProperties
  • Restart the following MS Exchange services ‘Microsoft Exchange System Attendant Service‘ & ‘Microsoft Exchange File Distribution Service
  • Download the address book manually to your email client without enabling the option ‘download changes since last send/receive

Check and confirm whether the newly added email alias is updated in GAL.


Reference : Technet forums.


How to find if your Exchange Server is an Open Relay ? How to close an Open Relay ?

An Internet facing Exchange server is said to be an Open Relay if, it accepts emails from any sender and delivers it to any recipient no matter if the recipient exists or not.

For eg: Consider that you have an Exchange Organization setup for the domain xyz.com. A user jim@abc.com sends an email to roddick@efg.com through your Exchange Server. The server accepts the email even-though the domain and user mailbox is unknown for it.  Such a set up can be extremely vulnerable to attacks and is not considered as a best practice.

Thus, from the above example you will get an idea that an Exchange Organization which is built upon the Best Practices will be configured only to accept emails from external senders to recipients that are either members of the Exchange Organization or an Accepted Domain [known domain].

Tests to find if an Exchange Server is an Open Relay :-

  • TELNET TEST: This is a simple test can be performed from the command line. We will try to send an email to an unknown user and check if the server accepts it or not.
  1. Start Command Prompt (CMD) by searching in Windows
  2. Type telnet and press Enter
  3. Once in telnet prompt, type set localecho
  4. Then type open [external ip/name] 25  eg: open 20.30.40.50 25
  5. Following response will be received ‘220 mail.server.domain Microsoft ESMTP MAIL Service, Version: 6.0.2790.0 Ready at’
  6. Type the command : ehlo firsttestdomain.com [Make sure that ‘firsttestdomain.com‘ is anything other than the domain your Exchange Server handles]
  7. Select OK and you will receive the following :250 OK
  8. Type the command mail from:user@firsttestdomain.com [Note, this email address is not a mailbox in the Exchange Server]
  9. Select OK and you will get the response
    250 2.1.0 user@firsttestdomain.com….Sender OK
  10. Type the command rcpt to:user@secondtestdomain.com [completely a new address not mentioned above]
  11. Once you select OK, you will receive a response and depending on that response we can determine if the server is an open relay or not:

If the response is

550 5.7.1 Unable to relay for user@secondtestdomain.com means, your server is not an open relay & is secure

At the same time, if the response is

250 2.1.5 user@secondtestdomain.com  means your server is un-secure and is an open relay.


  • DNSBL DIAGNOSTIC TEST : An alternative and a quick solution to determine open relay is by checking the domain against any of the DNS Block List providers such as MXTOOLBOX.COM.
  1. Access the website MXTOOLBOX.COM
  2. Select the SMTP DIAGNOSTICS tab
  3. Enter your mail server IP address or external name and select the Test Email Server tab
  4. You will receive a response stating whether the server is an open relay or not as shown in below eg:

MXTOOLBOX


CAUSES OF OPEN RELAY :-

The main causes that can turn an Exchange Server to an Open Relay is the configuration issues with the connectors and Accepted Domains. The following checks can be done on this regard:-

  • If ‘Externally Secured‘ option is enabled on the Internet Send/Receive connectors.

In the Exchange Management Console, Send Connectors can be found in Hub Transport role under Organization Configuration while, Receive Connectors in Hub Transport role under the Server Configuration. Make sure that in the properties -> Authentication section of these Internet connectors, the Externally Secured option is disabled in order to stop your Exchange Server being an Open Relay .

  • If Accepted Domains configured as ‘*’

In the Exchange Management console, Accepted Domain comes in Hub Transport role under Organization configuration. Accepted Domains are the domains that are known to the Exchange Server. The domains can be either Authoritative or Non-Authoritative. Make sure that no Accepted Domain are configured as ‘*’ to help protect your Exchange Server from being an Open Relay.


CLOSING AN OPEN RELAY ON EXCHANGE SERVER 2007/2010:-

The following command can be executed on Exchange Management Shell to disable Open Relay on an Exchange Server.

Get-ReceiveConnector “YourReceiveConnectorName” | Remove-ADPermission -User “NT AUTHORITY\ANONYMOUS LOGON” -ExtendedRights “ms-Exch-SMTP-Accept-Any-Recipient”

as per the link http://alanhardisty.wordpress.com/2010/07/12/how-to-close-an-open-relay-in-exchange-2007-2010.

Default Send/Receive connectors in Exchange 2013 !!

As we all know, it has been some time after the release of Exchange Server 2013. Some of you must have had the chance on getting a hands on experience with Exchange Server 2013. The Exchange Management Console has disappeared and the Exchange Admin Center which is a web console, is used for the Exchange Server Management with an Exchange Toolbox, as before.

Most of you must have configured send/receive connectors on Exchange 2007 or 2010, the steps for which is almost the same. However, with Exchange server 2013 the connector configurations are little bit confusing especially the Receive Connector configurations.

Exchange 2013 has by default 5 receive connectors and 1 send connector (as usual) which are essential for the mail flow.

Types of connectors

Recently we had faced an issue with one of our client who had accidentally deleted all his connectors and we were assigned the tasks to reconfigure them.

The default Exchange Server 2013 receive connectors, their associated ports and configurations according to the server roles are discussed below. On a mailbox server you will find :-

  • Client Proxy [server name] – It accepts connection from Frontend servers.

Client Proxy 1          Client Proxy 2

Client Proxy 3

  • Default [server name] – It accepts connection from Mailbox servers that has the Transport service running and the Edge servers.

Default 1        Default 2 Default 3

At the same time, on a CAS you will find :-

  • Client Frontend [server name] It accepts secure connections, that has the Transport layer Security (TLS) applied.

Client Frontend 1            Client Frontend 2Client Frontend 3


  • Default Frontend [server name] – It accepts messages from SMTP connections over port 25.

Default Frontend 1          Default Frontend 2

Default Frontend 3

  • Outbound Proxy Frontend [server name] – It accepts connections from a smart host.

Outbound Proxy 1          Outbound Proxy 2

Outbound Proxy 3

In order to avoid confusion, keep in mind that anything related to Frontend will be part of the CAS. This is because messages comes into the CAS first which in turn is forwarded to the Mailbox Server.


Only 1 internet send connector is required for the mail flow to work successfully. You can specify either a smart host to route emails or directly use DNS for email delivery.